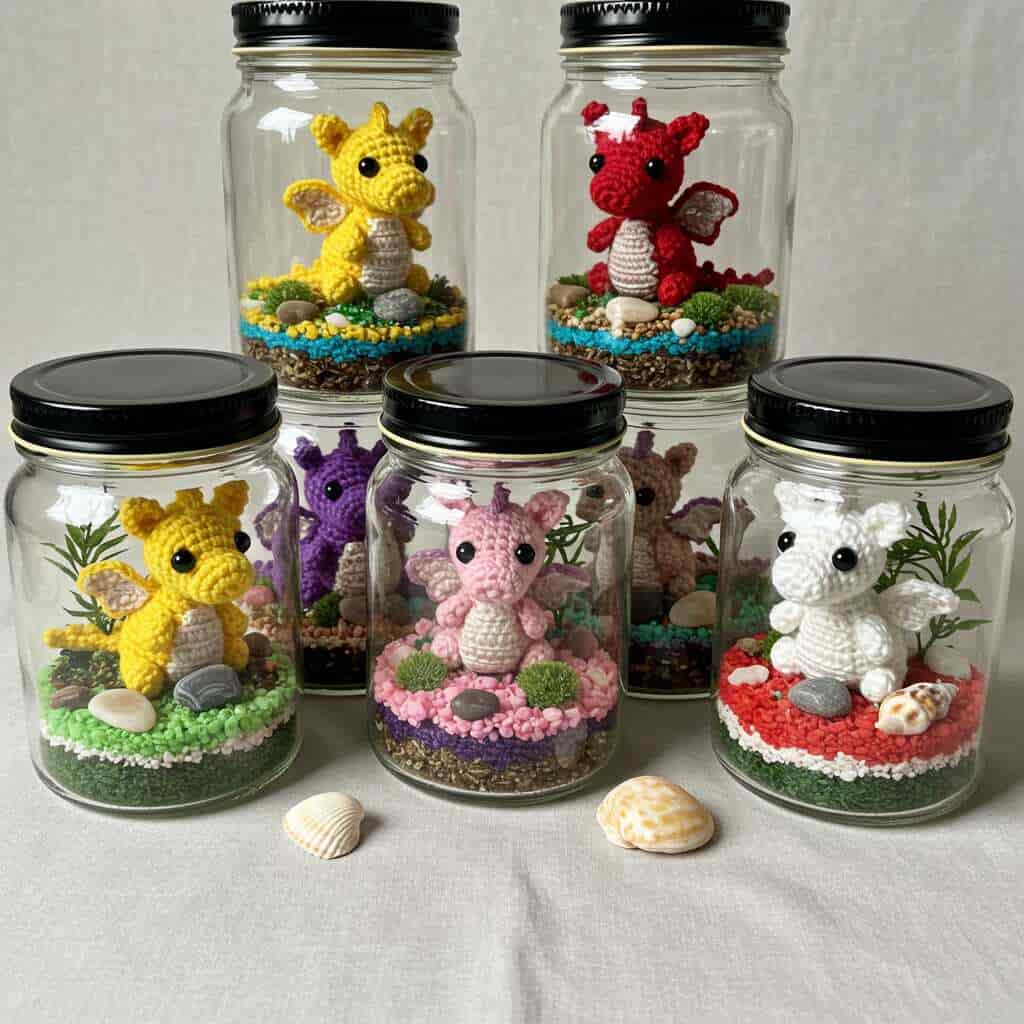
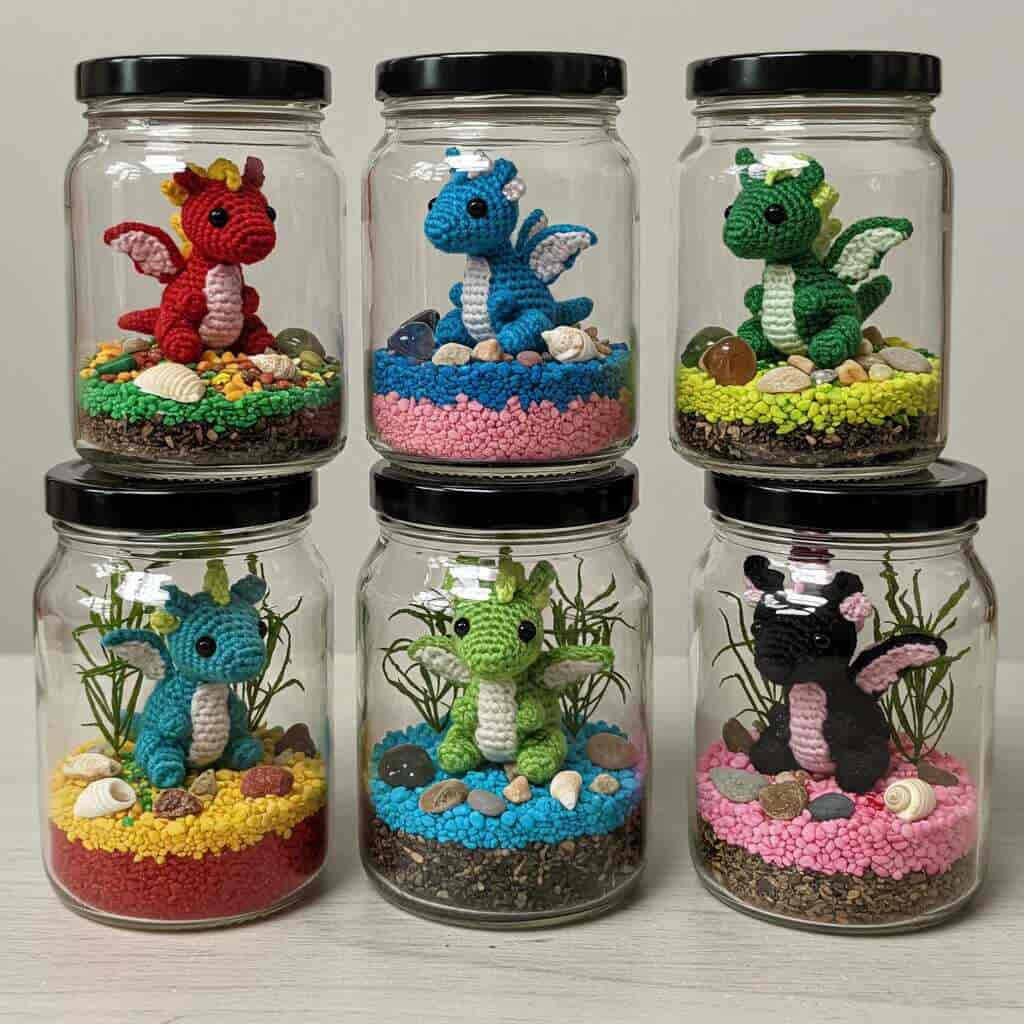
Crocheting is more than just a craft; it’s an art form that allows creators to bring their imagination to life, one stitch at a time. Among the countless patterns available for crocheters, few capture the whimsy and charm quite like the “Crochet Baby Dragon.” These adorable creatures embody fantasy and creativity, making them perfect companions for beginners eager to explore the world of crochet. Whether you’re crafting one as a keepsake for a loved one or simply indulging in your passion for handmade creations, learning how to crochet a baby dragon can be a rewarding journey.
This step-by-step guide is designed specifically for those who are new to the craft, breaking down the process into manageable stages while providing detailed instructions and tips along the way. From understanding the basics of crochet to assembling your very own dragon, this article will walk you through every aspect of the project. You’ll not only learn how to create something truly magical but also develop foundational skills that will serve you well in future crochet endeavors.
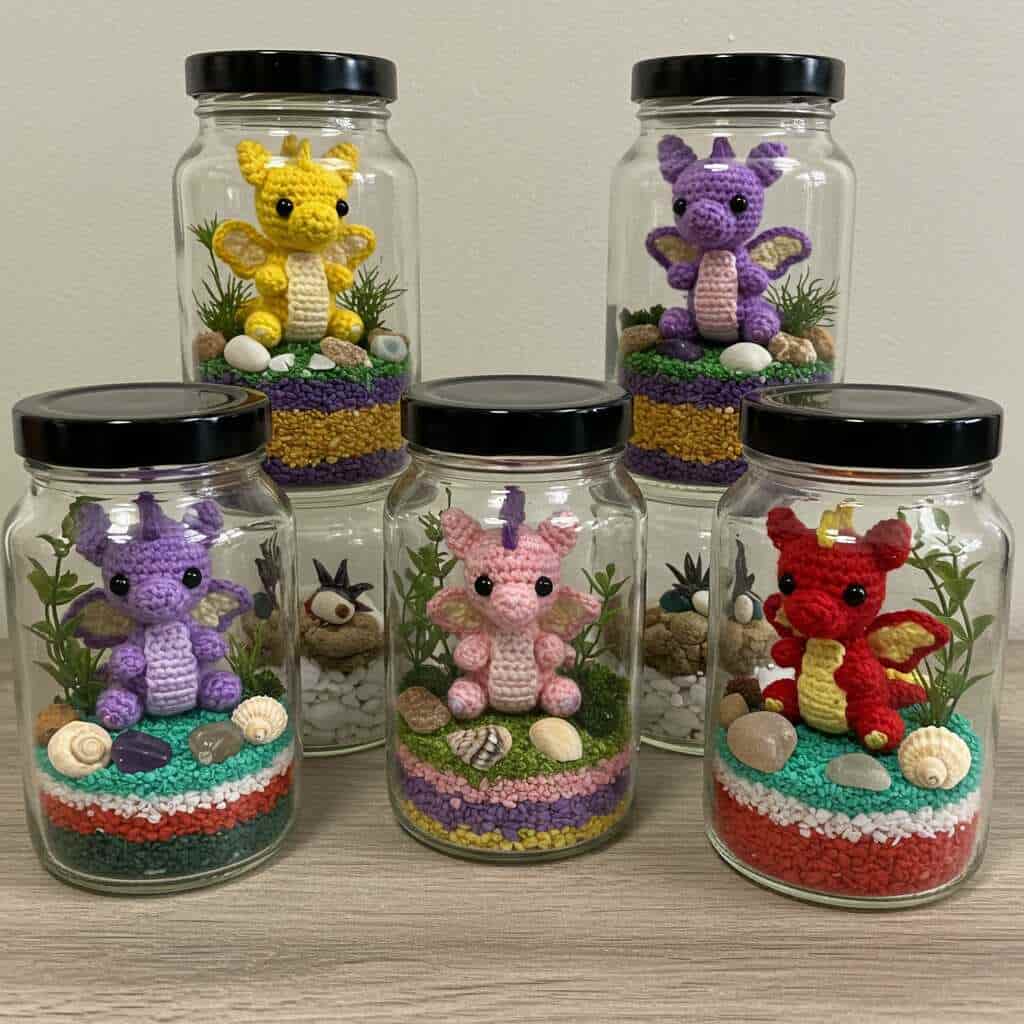
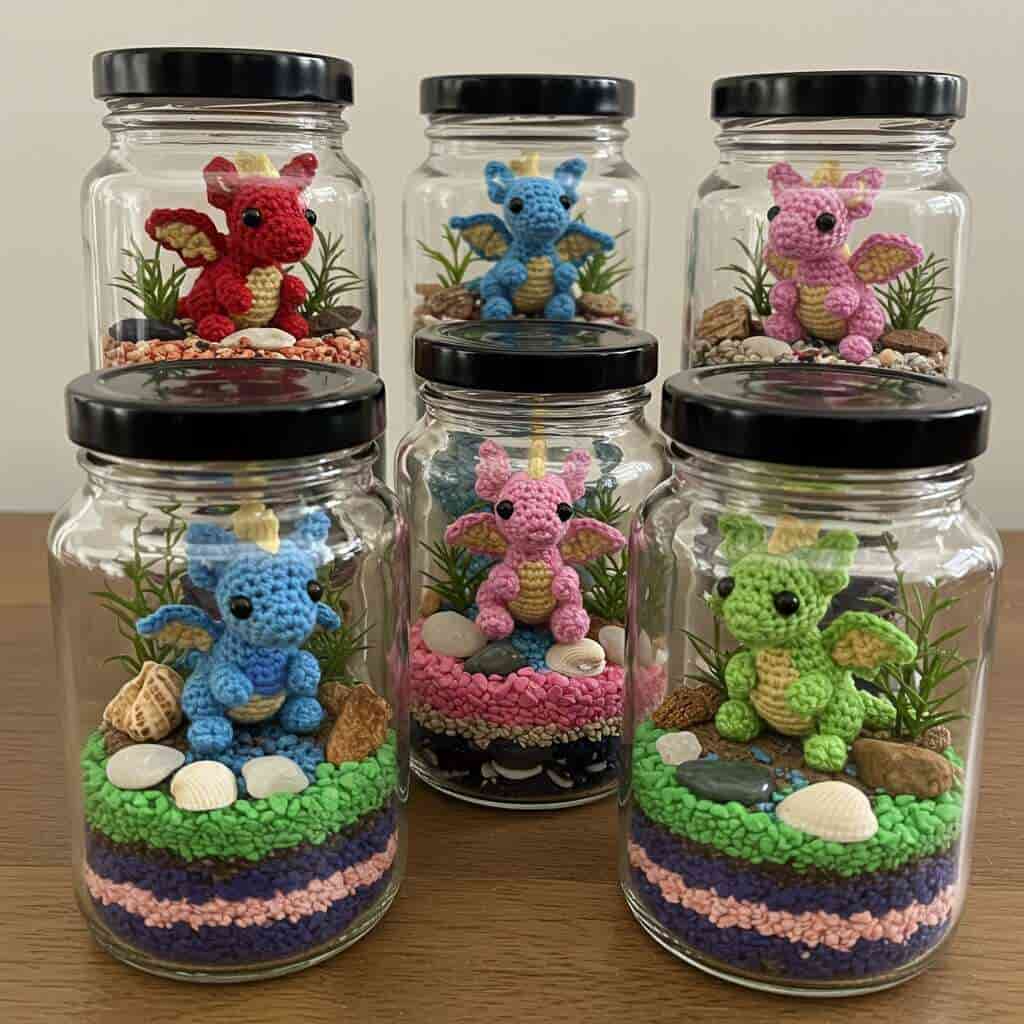
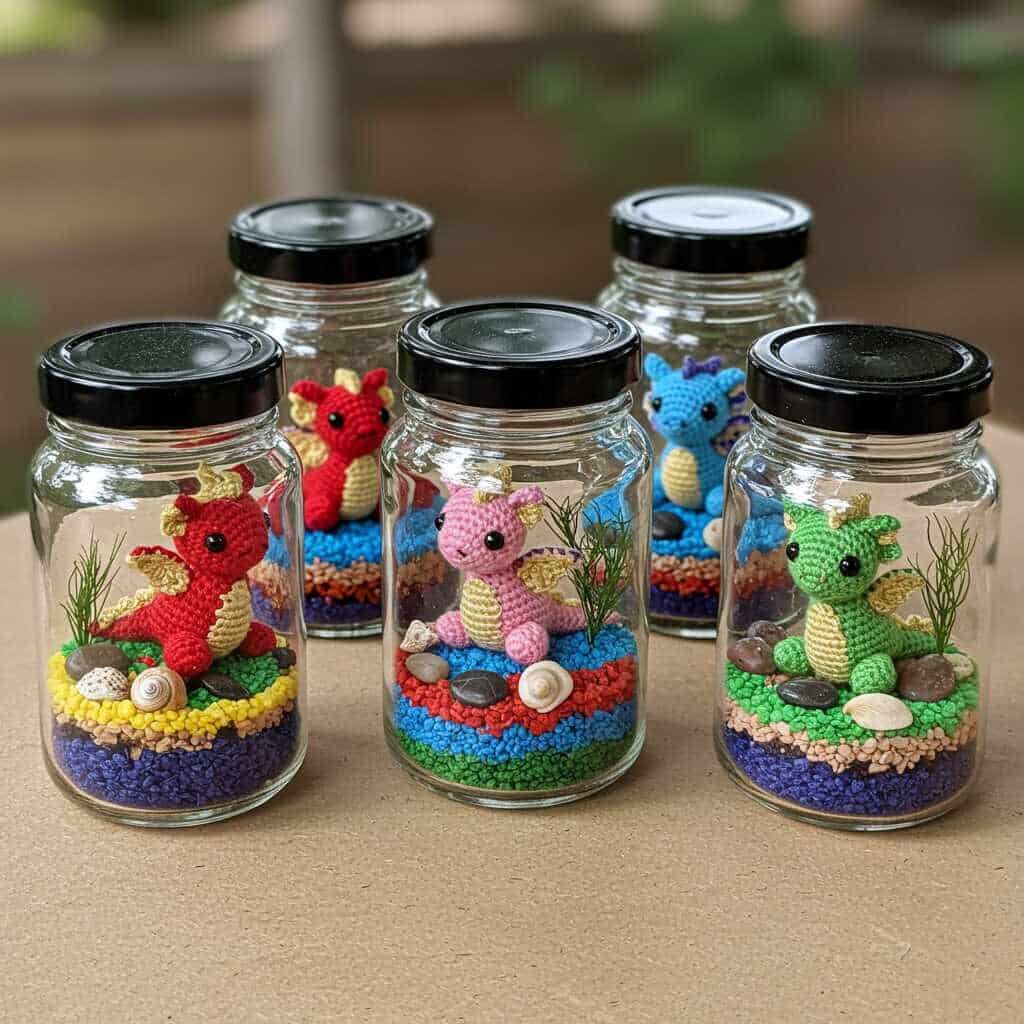
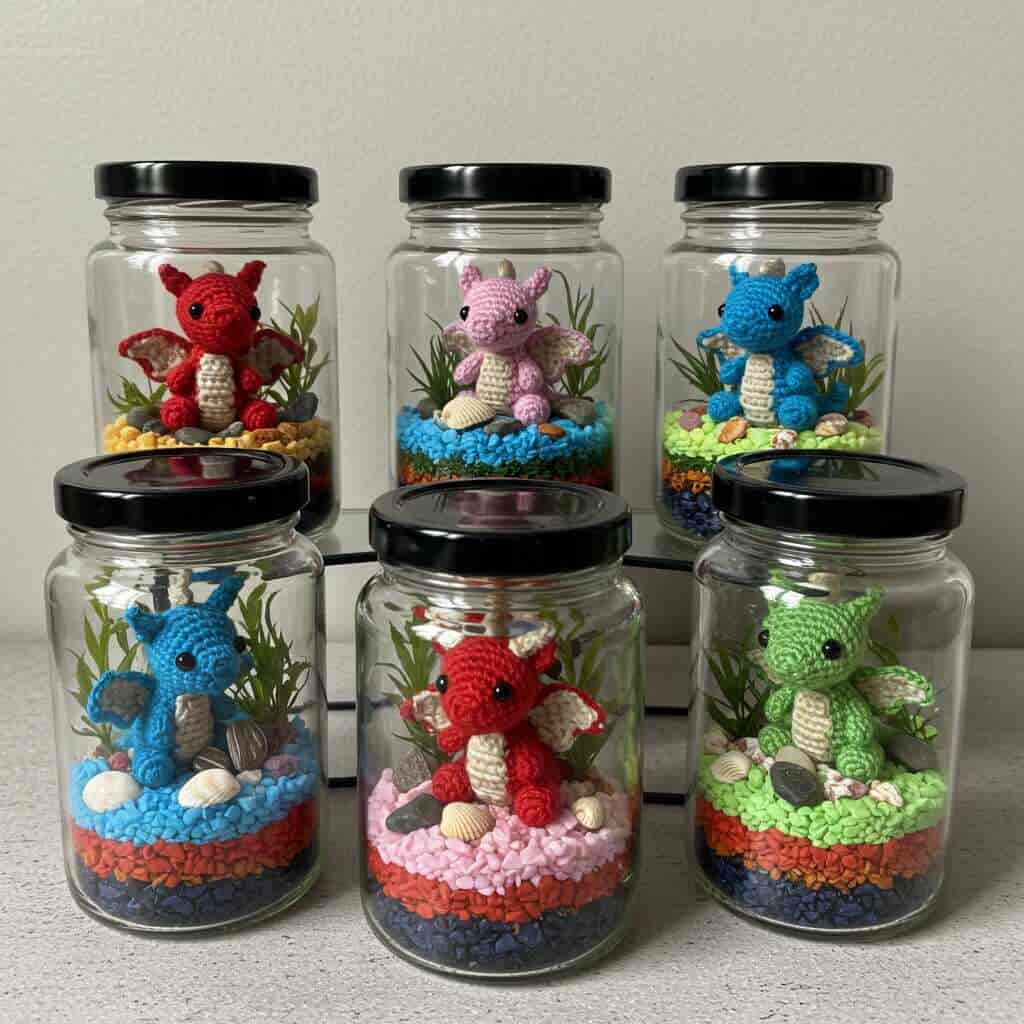
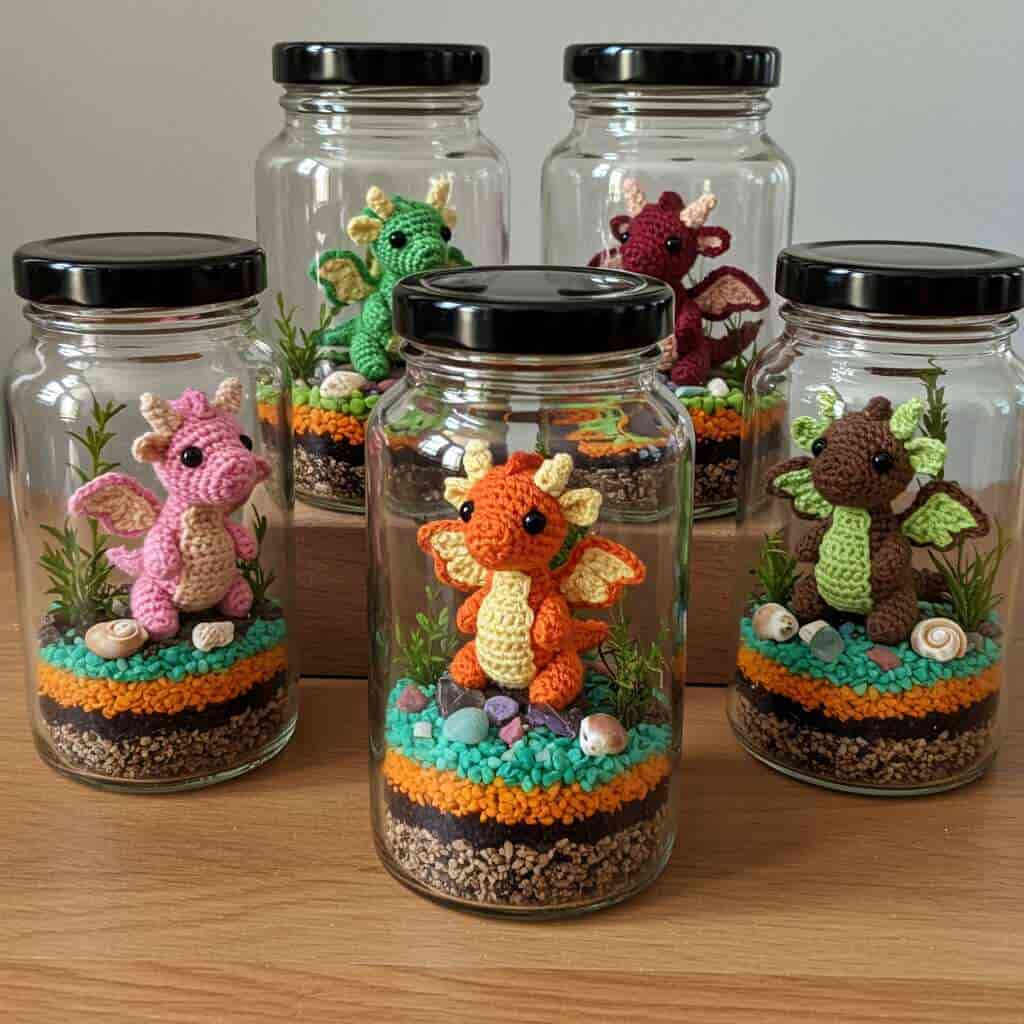
The beauty of a crochet baby dragon lies in its versatility. With endless possibilities for customization—such as color choices, wing shapes, and embellishments—you can make each creation uniquely yours. Beyond being a delightful addition to any toy collection, these dragons can serve as thoughtful gifts, decorative pieces, or even companions for children. Their small size makes them portable and easy to display, while their intricate details showcase the care and effort poured into their creation.
By embarking on this creative adventure, you’ll discover the joy of transforming simple yarn into something extraordinary. So grab your hook, choose your favorite colors, and prepare to dive into the enchanting world of crocheting a baby dragon. Let’s begin!
Understanding the Basics of Crochet: Tools and Materials for Your Baby Dragon Project
Before diving into the magical process of creating your crochet baby dragon, it’s essential to familiarize yourself with the tools and materials required for this project. Each item plays a critical role in ensuring your stitches are consistent, your work flows smoothly, and your dragon takes shape beautifully. For beginners, selecting the right supplies can make all the difference in building confidence and achieving satisfying results.
Yarn Selection
The first and most important material you’ll need is yarn. For a crochet baby dragon, medium-weight (worsted) yarn is ideal. This type of yarn strikes a perfect balance between durability and softness, making it suitable for both beginners and the intended purpose of the project. Worsted yarn is also widely available in a variety of colors, allowing you to bring your dragon to life with vibrant hues for its body, wings, and accents. When choosing yarn, consider opting for acrylic blends, as they are affordable, easy to work with, and machine washable—a practical choice if your dragon will be handled frequently.
If you want to add texture or uniqueness to your dragon, feel free to experiment with specialty yarns such as variegated or metallic threads. However, it’s best to stick to smooth, solid-colored yarn for your first attempt to ensure clarity when following patterns and counting stitches.
Crochet Hooks
Next, you’ll need a crochet hook. The size of the hook should correspond to the weight of your chosen yarn. For worsted yarn, hooks ranging from 4.5mm to 5.5mm (sizes H-7 to I-9 in US terminology) are typically recommended. Beginners may find a slightly larger hook easier to handle, as it allows for looser stitches and minimizes hand fatigue during long crafting sessions. Ergonomic hooks with padded handles are particularly helpful for maintaining comfort, especially if you plan to crochet for extended periods.
It’s also wise to have a set of hooks in varying sizes on hand, as some parts of your dragon—like the tail or horns—may require smaller hooks for precision work. A versatile set ensures you’re prepared for any adjustments needed throughout the project.
Additional Supplies
Beyond yarn and hooks, several other tools and materials are indispensable for bringing your crochet baby dragon to life:
- Stitch Markers : These small, often colorful rings are used to mark specific points in your work, such as the beginning of a round or key placement areas for features like eyes or limbs. They help prevent mistakes and ensure symmetry in your design.
- Yarn Needle : A blunt-tipped needle is essential for weaving in loose ends and sewing together different parts of your dragon. Look for one with a large eye to accommodate your yarn thickness.
- Scissors : A sharp pair of scissors is necessary for cleanly cutting yarn without fraying. Compact embroidery scissors are a popular choice among crocheters due to their precision and portability.
- Stuffing Material : Polyester fiberfill stuffing is commonly used to give your dragon its three-dimensional form. It’s lightweight, hypoallergenic, and easy to manipulate, ensuring your finished piece feels soft yet firm.
- Safety Eyes or Embroidery Thread : Depending on your preference, you can use safety eyes to give your dragon an expressive face or embroider the eyes using contrasting thread. Safety eyes provide a polished look but aren’t recommended for projects intended for very young children due to choking hazards.
- Pattern Guide : While not a physical tool, having a clear, beginner-friendly pattern is crucial for navigating the steps involved in creating your dragon. Many patterns include visual aids and detailed instructions, which can significantly boost your confidence as you progress through the project.
Setting Up Your Workspace
Once you’ve gathered your materials, take a moment to organize your workspace. A clean, well-lit area with ample room to spread out your supplies will enhance your focus and efficiency. Keep frequently used items like your hook, yarn, and stitch markers within arm’s reach to minimize interruptions. Additionally, consider placing a small container nearby to collect scraps and trimmings, keeping your space tidy as you work.
With these tools and materials at your disposal, you’re now equipped to embark on the enchanting journey of creating your very own crochet baby dragon. In the next section, we’ll delve into mastering the fundamental stitches that will form the foundation of your project.
Mastering Essential Stitches: Building Blocks for Your Crochet Baby Dragon
Creating a crochet baby dragon begins with mastering a few essential stitches that serve as the foundation of your project. For beginners, understanding and practicing these stitches is key to ensuring a smooth and enjoyable crafting experience. This section will introduce you to the basic stitches you’ll need, including chain stitch, single crochet, and increase/decrease techniques, while providing step-by-step guidance to help you execute them confidently.
Chain Stitch (ch)
The chain stitch is the starting point for nearly every crochet project, including your baby dragon. It creates the base row upon which all subsequent stitches are built. To make a chain stitch:
- Create a slip knot by forming a loop with your yarn and pulling the working end through to tighten it around your hook.
- Hold the hook in your dominant hand and wrap the yarn over the hook from back to front using your non-dominant hand.
- Pull the wrapped yarn through the loop already on the hook, creating a new chain.
- Repeat this process until you’ve reached the desired number of chains. For example, if your pattern specifies starting with 10 chains, continue until you have 10 loops on your hook.
Practicing this stitch will help you achieve consistent tension, which is crucial for neat and uniform work. If your chains appear too tight or uneven, adjust how loosely you hold the yarn and relax your grip on the hook.
Single Crochet (sc)
The single crochet is one of the simplest and most versatile stitches in crochet. It’s used extensively in amigurumi projects like your baby dragon to create dense, sturdy fabric. Here’s how to perform a single crochet:
- Insert your hook into the second chain from the hook (or the designated stitch in a row).
- Yarn over (wrap the yarn around the hook) and pull it through the chain, leaving two loops on your hook.
- Yarn over again and pull it through both loops on the hook, completing one single crochet.
- Continue working single crochets across the row or in rounds, depending on your pattern.
When crocheting in rounds—common for amigurumi—you’ll typically join the last stitch to the first stitch of the round with a slip stitch to maintain a continuous spiral. Practice maintaining even spacing between stitches to avoid gaps or bunching.
Increase and Decrease Techniques
To shape your baby dragon’s body, head, and limbs, you’ll need to master increasing and decreasing stitches. These techniques allow you to add or reduce the number of stitches in a row, creating contours and curves that give your dragon its unique form.
Increasing
An increase involves working multiple stitches into the same stitch or space, effectively adding stitches to your row. To increase using single crochet:
- Insert your hook into the designated stitch or space.
- Work one single crochet as usual.
- Without moving to the next stitch, insert your hook back into the same stitch or space and work another single crochet.
- You’ve now created two stitches where there was originally one, increasing the total stitch count.
In patterns, increases are often indicated by symbols like “inc” or written instructions specifying how many stitches to add.
Decreasing
Decreasing reduces the number of stitches by combining two stitches into one. This technique is essential for tapering areas like the dragon’s tail or snout. To decrease using single crochet:
- Insert your hook into the first stitch and yarn over, pulling up a loop (two loops on the hook).
- Insert your hook into the next stitch and repeat the process, leaving three loops on the hook.
- Yarn over once more and pull through all three loops, completing the decrease.
- You’ve now combined two stitches into one, reducing the total stitch count.
Decreases are commonly marked in patterns with terms like “dec” or visual cues indicating which stitches to combine.
Practicing Before Starting Your Dragon
Before diving into your baby dragon project, spend time practicing these stitches separately. Create small swatches of fabric using rows of chain stitches, single crochets, and combinations of increases and decreases. Pay attention to maintaining consistent tension and keeping your edges straight. These exercises will build your confidence and muscle memory, ensuring smoother execution when you transition to the actual dragon pattern.
By mastering the chain stitch, single crochet, and increase/decrease techniques, you’ll have the foundational skills needed to tackle the intricate details of your crochet baby dragon. In the next section, we’ll explore how to assemble the various parts of your dragon, bringing your creation closer to life.
Assembling Your Crochet Baby Dragon: Piecing Together the Magic
Now that you’ve mastered the essential stitches and crafted the individual components of your crochet baby dragon, it’s time to bring the creature to life through assembly. This stage is where your dragon truly begins to take shape, transforming from separate pieces into a cohesive, three-dimensional creation. Properly joining the head, body, wings, and limbs requires patience and attention to detail, but the result will be a charming companion that showcases your hard work and creativity.
Step 1: Preparing the Pieces
Before assembling your dragon, ensure all the pieces are complete and ready for attachment. Lay out the components—head, body, wings, arms, legs, and tail—and inspect them for consistency. Check that each piece has been stuffed firmly but not excessively, as overly compact stuffing can distort the shape and make sewing difficult. Trim any excess yarn tails close to the fabric, leaving just enough length to weave in later. At this stage, it’s also helpful to identify the placement of features like eyes or horns, marking their positions with stitch markers if necessary.
Step 2: Attaching the Head to the Body
The head is typically the focal point of your dragon, so attaching it securely is crucial. Begin by aligning the open edge of the head with the corresponding opening on the body. Use a yarn needle and a length of matching yarn to sew the pieces together using a whipstitch or mattress stitch. The whipstitch creates a visible seam that adds texture, while the mattress stitch produces a nearly invisible join for a cleaner look. Start at the center of the seam and work outward in both directions to ensure symmetry. Pull the yarn snugly but not too tightly to avoid puckering the fabric.
Once the head is attached, reinforce the connection by weaving in the ends securely. This step is particularly important if your dragon will be handled frequently, as it ensures the head remains firmly in place.
Step 3: Adding the Limbs
Next, attach the arms and legs to the body. Most patterns position the limbs slightly below the midpoint of the body, giving the dragon a balanced appearance. Flatten the base of each limb slightly to create a stable surface for attachment. Using a yarn needle, sew the flattened edge to the body with small, even stitches. For added stability, you can work a few extra stitches into the joint area to anchor the limb securely.
Take care to align the limbs symmetrically, ensuring the dragon sits evenly when placed on a flat surface. If your pattern includes bendable wire within the limbs, gently adjust their positioning after sewing to achieve the desired pose.
Step 4: Securing the Tail
The tail is often one of the most expressive features of your dragon, so its placement matters. Align the narrow end of the tail with the lower back of the body, positioning it centrally for balance. Sew the tail in place using the same method as the limbs, taking care to blend the seam seamlessly into the surrounding fabric. If your dragon’s tail includes decorative elements like spikes or ridges, ensure they face outward for maximum visual impact.
Step 5: Attaching the Wings
Wings are what give your dragon its fantastical flair, so their placement is worth careful consideration. Most patterns suggest attaching the wings to either side of the body, slightly above the midpoint. Position them symmetrically and angle them upward to mimic a natural pose. Flatten the base of each wing and secure it to the body with a yarn needle, using small stitches to minimize visibility. Reinforce the attachment points to ensure the wings remain sturdy and proportional.
For an extra touch of whimsy, you can lightly stuff the wings before attaching them. This adds dimension and makes them stand out more prominently.
Step 6: Final Touches
Once all major components are assembled, focus on the finer details that bring your dragon to life. If you haven’t already, add safety eyes or embroider facial features like eyes, nostrils, and a mouth. Use contrasting yarn colors to highlight these details, ensuring they complement the overall design. For additional embellishments, consider adding small horns, spikes, or scales using leftover yarn scraps. Secure these elements with a yarn needle, anchoring them firmly to prevent loosening over time.
Finally, weave in all remaining yarn ends to give your dragon a polished finish. Trim any stray fibers and fluff the stuffing gently to restore its shape. With these final touches complete, your crochet baby dragon is ready to enchant its audience.
Assembling your dragon is a labor of love, requiring precision and care to achieve the best results. By following these steps, you’ll create a cohesive and captivating creature that reflects your craftsmanship and imagination. In the next section, we’ll explore how to customize your dragon, allowing you to infuse it with personality and individuality.
Customizing Your Crochet Baby Dragon: Adding Personality and Flair
One of the most exciting aspects of creating a crochet baby dragon is the opportunity to personalize it, making it a one-of-a-kind masterpiece. Customization allows you to infuse your dragon with unique characteristics that reflect your creativity and style. Whether you’re crafting a whimsical companion or a meaningful gift, the possibilities for embellishment are virtually limitless. This section explores various ways to enhance your dragon’s appearance through color choices, textures, and decorative elements, ensuring your creation stands out as a true reflection of your artistic vision.
Color Choices: Bringing Your Dragon to Life
Color plays a pivotal role in defining your dragon’s personality and mood. Traditional dragons might feature bold, fiery hues like red, orange, and gold, evoking images of mythical beasts guarding treasures. Alternatively, pastel shades such as lavender, mint green, or baby blue can lend a softer, more playful aesthetic, perfect for a cuddly toy or nursery decoration. Experiment with gradients or ombre effects by transitioning between complementary colors—for instance, blending deep purple into shimmering silver for a regal, mystical look.
Don’t shy away from unconventional palettes either. A dragon in rainbow stripes or neon tones can become a vibrant statement piece, while earthy browns and greens might suit a woodland-inspired theme. Consider the intended recipient or setting when choosing colors, as this decision can significantly influence the dragon’s overall vibe.
Textures: Creating Depth and Interest
Adding texture to your dragon elevates its visual appeal and tactile experience. One effective technique is incorporating textured stitches into certain areas, such as the belly or wings. For example, a bobble stitch can mimic scaly skin, while a puff stitch adds volume and whimsy to the chest or tail tip. You can also experiment with different yarn types—using fuzzy yarn for the mane or metallic thread for accents—to introduce variety and intrigue.
Layering textures is another powerful way to enhance depth. Try crocheting small patches of ridged fabric to represent scales along the dragon’s back or stitching tufts of yarn to simulate fur around its neck. These subtle details draw the eye and invite closer inspection, making your dragon feel alive and dynamic.
Decorative Elements: Adding Whimsy and Charm
Decorative embellishments are where your dragon truly begins to shine. Start with the eyes, which serve as the focal point of its expression. If you’ve opted for embroidered eyes, use French knots or satin stitches to create lifelike pupils and irises. Alternatively, attach tiny beads or buttons for a sparkling effect, ensuring they are securely fastened for safety.
Horns, spikes, and ridges are classic dragon features that can be customized to match your design vision. Use contrasting yarn colors to make them pop, or incorporate metallic thread for a glistening finish. For a more elaborate touch, crochet miniature flowers or stars and sew them onto the dragon’s body as magical adornments.
Consider adding accessories to give your dragon a distinct personality. A tiny scarf or hat crocheted in coordinating colors transforms it into a seasonal delight, while a removable saddle or harness introduces an element of adventure. Even simple additions like a pompom tail or tassel wings can inject fun and flair into your design.
Thematic Customizations: Telling a Story
Finally, think about how your dragon fits into a broader narrative or theme. Is it a guardian of enchanted forests, a mischievous trickster, or a loyal companion? Tailor your customization choices to align with this concept. For instance, a forest-themed dragon might sport mossy green scales and leaf-shaped wings, while a celestial dragon could shimmer with star-like sequins and moonlit hues. Personal touches like monogrammed initials or symbolic motifs can also imbue your creation with deeper meaning.
Customizing your crochet baby dragon is a chance to let your imagination run wild. By thoughtfully selecting colors, experimenting with textures, and incorporating decorative elements, you can craft a dragon that is not only visually stunning but also rich in personality. In the concluding section, we’ll reflect on the joys of completing this project and how it sets the stage for future crochet adventures.
Conclusion: Celebrating Creativity and Looking Forward
Completing your crochet baby dragon is more than just finishing a project—it’s a celebration of creativity, patience, and skill. Each stitch, color choice, and embellishment tells a story of dedication and imagination, culminating in a unique creation that embodies the magic of handmade artistry. Whether this dragon serves as a cherished keepsake, a heartfelt gift, or simply a testament to your newfound abilities, it stands as a tangible reminder of the joy and satisfaction that crochet can bring.
This journey has likely introduced you to new techniques, fostered a deeper appreciation for the craft, and perhaps even sparked a passion for exploring more intricate designs. The skills you’ve honed while creating your dragon—mastering stitches, assembling components, and customizing details—are foundational tools that will empower you to tackle future projects with confidence. From whimsical creatures to functional home décor, the possibilities are endless, and the sense of accomplishment you’ve experienced here will only grow as you expand your repertoire.
Remember, the true essence of crochet lies not just in the finished product but in the process itself. Embrace the moments of discovery, the challenges overcome, and the quiet joy of watching your vision come to life. As you move forward, let this experience inspire you to keep experimenting, learning, and creating. Who knows? Your next project might just be another enchanting dragon—or something entirely unexpected, waiting to unfold under your hook.