The allure of the coast is undeniable. The soothing sound of waves, the soft touch of sand beneath your feet, and the vibrant hues of the ocean create a sense of tranquility that many of us long to bring into our homes. While we can’t always live by the beach, we can certainly bring a piece of it into our living spaces. One of the most innovative and stunning ways to achieve this is by installing an Epoxy Beach Countertop. This unique design element not only serves as a functional surface but also as a captivating piece of art that evokes the serene beauty of the seaside. In this article, we will explore the concept of an Epoxy Beach Countertop, its benefits, and how you can incorporate this coastal masterpiece into your home.

Part 1: The Allure of Coastal Design and the Rise of Epoxy Beach Countertops
The Timeless Appeal of Coastal Aesthetics
Coastal design has always been a popular choice for homeowners who want to create a relaxing and inviting atmosphere in their living spaces. The coastal aesthetic is characterized by its light, airy, and natural elements, often incorporating colors like soft blues, sandy beiges, and crisp whites. Textures such as weathered wood, woven fibers, and smooth stones are also commonly used to evoke the feeling of being by the sea.
The appeal of coastal design lies in its ability to transport us to a place of peace and relaxation. It’s a style that encourages us to slow down, breathe deeply, and appreciate the simple beauty of nature. Whether you live by the coast or in a landlocked area, incorporating coastal elements into your home can create a serene retreat that feels like a permanent vacation.
The Emergence of Epoxy Beach Countertops
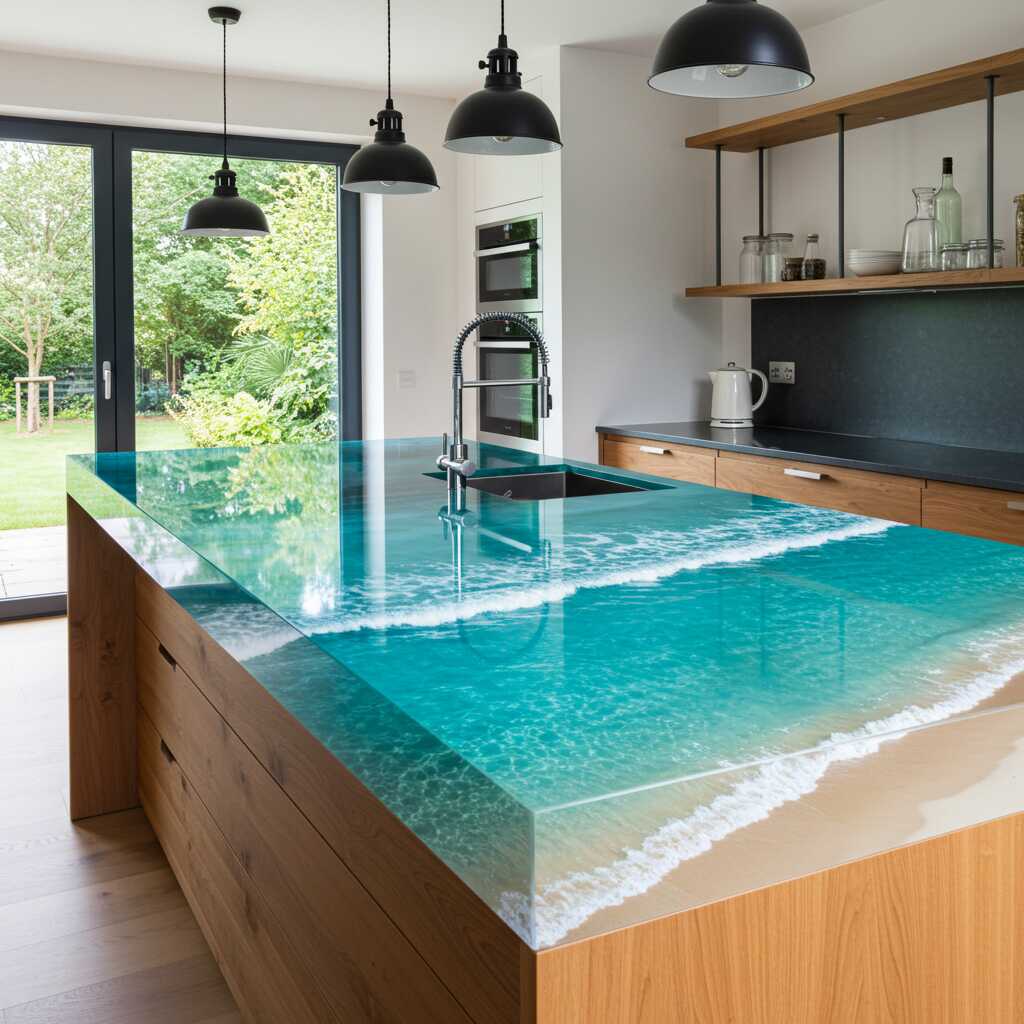
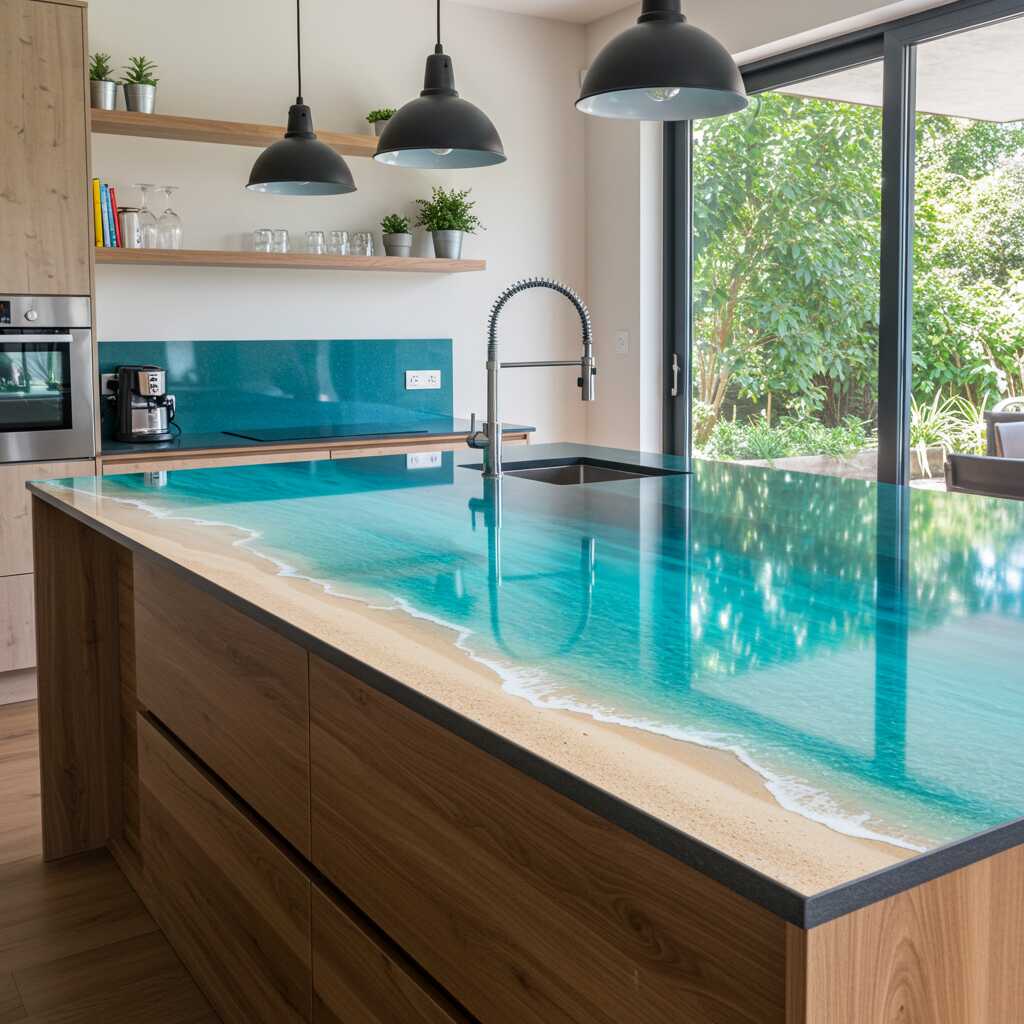
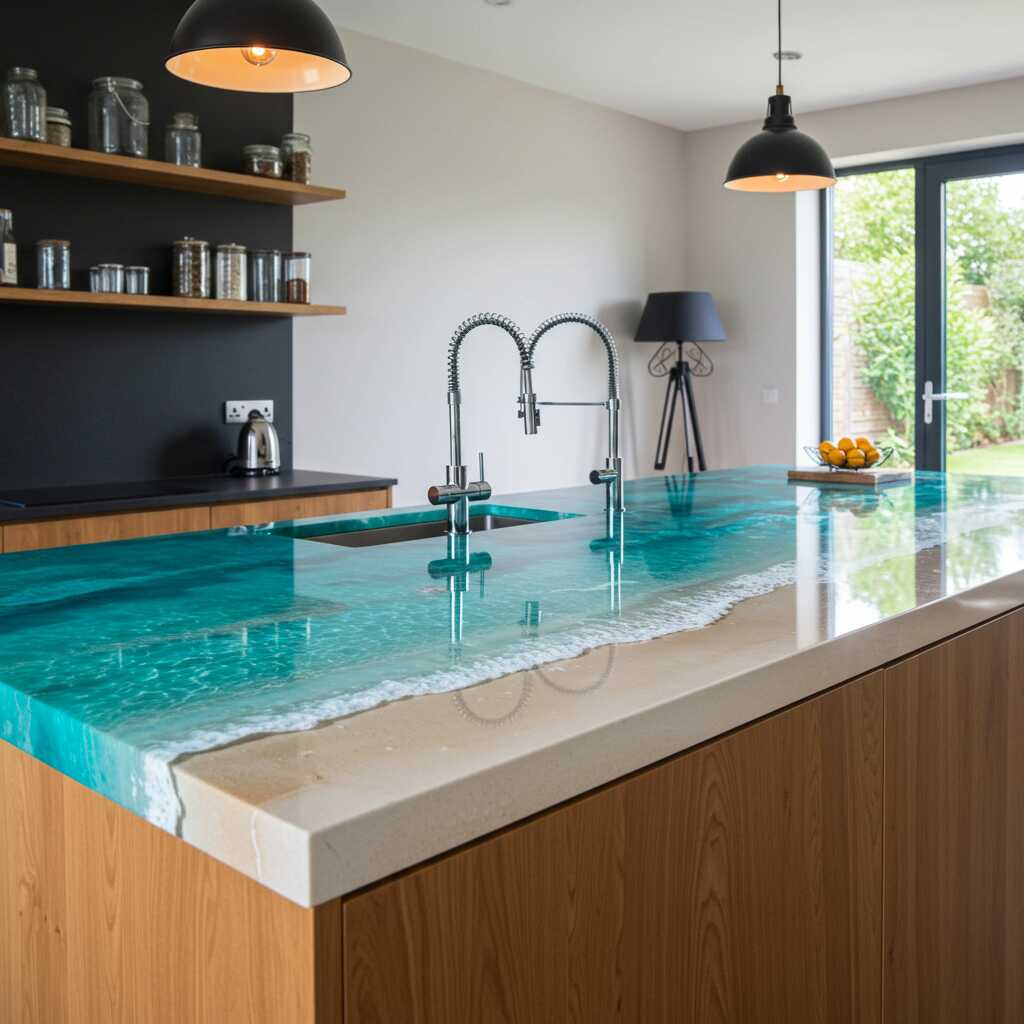
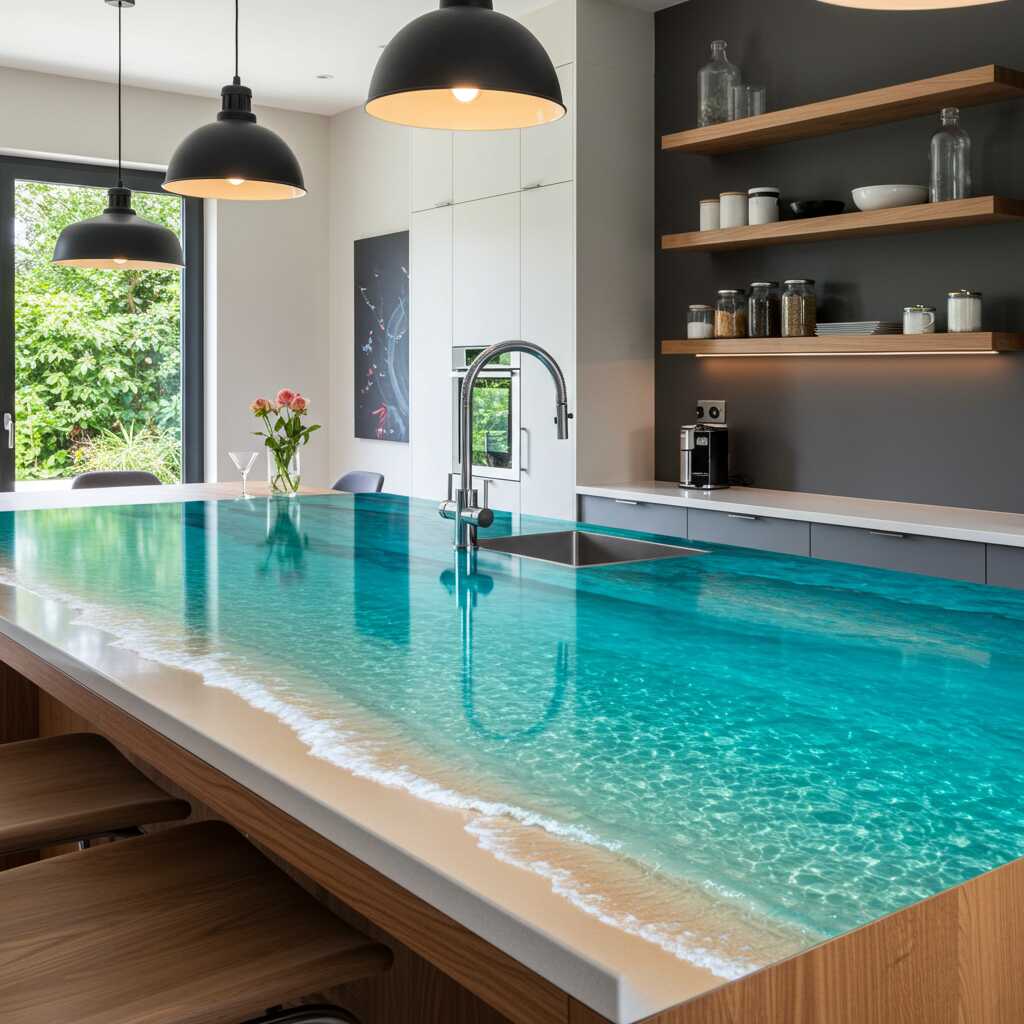
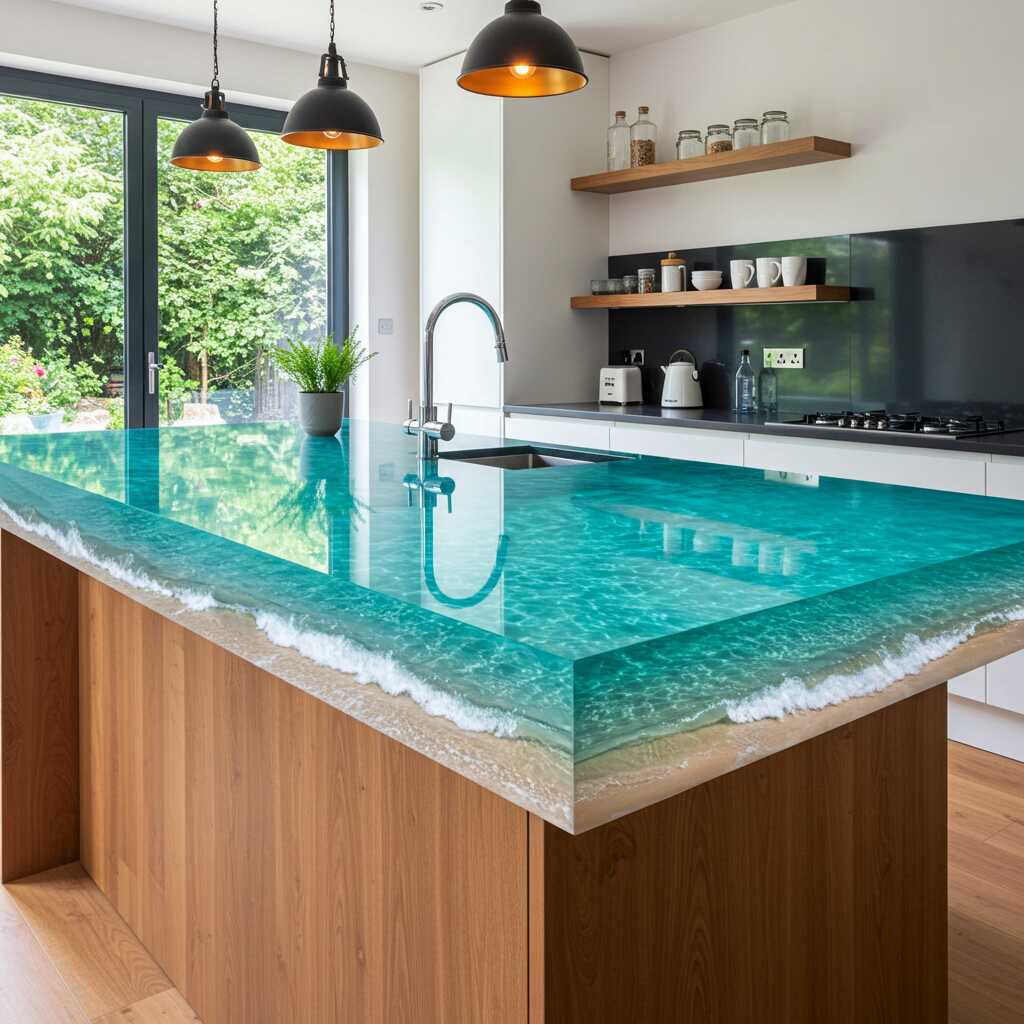
In recent years, Epoxy Beach Countertops have emerged as a revolutionary way to bring the beauty of the coast into the kitchen, bathroom, or any other space in your home. Epoxy resin, a durable and versatile material, has become a favorite among designers and homeowners for its ability to create stunning, custom surfaces. When combined with elements like sand, shells, and ocean-inspired colors, epoxy resin can be transformed into a breathtaking countertop that mimics the look and feel of a beach.
The process of creating an Epoxy Beach Countertop involves pouring layers of epoxy resin over a base surface, such as wood or concrete, and embedding natural materials like sand, seashells, and even small pebbles into the resin. The result is a smooth, glossy surface that captures the essence of the beach, complete with the textures and colors of the shore. This innovative design technique allows you to customize your countertop to reflect your personal connection to the coast, making it a truly unique addition to your home.
Why Choose an Epoxy Beach Countertop?
There are several reasons why an Epoxy Beach Countertop is an excellent choice for homeowners looking to incorporate coastal design into their spaces:
- Durability: Epoxy resin is known for its strength and durability, making it an ideal material for countertops. It is resistant to scratches, stains, and heat, ensuring that your Epoxy Beach Countertop will remain beautiful and functional for years to come.
- Customization: One of the most appealing aspects of an Epoxy Beach Countertop is the ability to customize it to your liking. You can choose the colors, textures, and materials that best reflect your vision of the coast, creating a one-of-a-kind piece that is uniquely yours.
- Low Maintenance: Unlike natural stone countertops, which require regular sealing and maintenance, epoxy countertops are relatively low maintenance. They are easy to clean and resistant to most household chemicals, making them a practical choice for busy households.
- Aesthetic Appeal: An Epoxy Beach Countertop is not just a functional surface; it is also a work of art. The combination of epoxy resin and natural materials creates a visually stunning effect that can serve as the focal point of any room.
- Versatility: While Epoxy Beach Countertops are often associated with kitchens and bathrooms, they can be used in a variety of spaces, including bars, dining tables, and even outdoor areas. Their versatility makes them a great option for anyone looking to add a touch of coastal beauty to their home.
Part 2: Creating Your Own Epoxy Beach Countertop
Step 1: Planning and Design
The first step in creating an Epoxy Beach Countertop is to plan and design your project. This involves deciding on the size, shape, and location of your countertop, as well as choosing the colors and materials that will be used in the design.
- Size and Shape: Consider the dimensions of the space where the countertop will be installed. Will it be a small bathroom vanity or a large kitchen island? The size and shape of your countertop will influence the overall design and the amount of materials needed.
- Color Palette: The colors you choose for your Epoxy Beach Countertop will set the tone for the entire space. Soft blues, greens, and sandy beiges are popular choices for coastal designs, but you can also incorporate other colors that reflect your personal style.
- Materials: The materials you embed in the epoxy resin will add texture and depth to your countertop. Consider using sand, seashells, small pebbles, or even pieces of driftwood to create a realistic beach effect. You can also add glitter or metallic pigments to the resin for a touch of sparkle.
Step 2: Preparing the Base Surface
Once you have a clear plan in place, the next step is to prepare the base surface for the epoxy resin. This can be done using a variety of materials, including wood, concrete, or even an existing countertop.
- Wood: If you are using wood as the base, make sure it is smooth and free of any imperfections. Sand the surface to create a rough texture that will help the epoxy resin adhere better. You may also want to seal the wood with a primer to prevent any air bubbles from forming in the resin.
- Concrete: Concrete is another popular choice for the base surface. It is durable and provides a solid foundation for the epoxy resin. If you are using concrete, make sure it is clean and free of any dust or debris before applying the resin.
- Existing Countertop: If you are updating an existing countertop, you can apply the epoxy resin directly over the surface. However, make sure the surface is clean and free of any grease or dirt before starting the process.
Step 3: Mixing and Pouring the Epoxy Resin
The next step is to mix and pour the epoxy resin. This is a critical part of the process, as the quality of the resin will determine the final look and durability of your countertop.
- Mixing the Resin: Follow the manufacturer’s instructions for mixing the epoxy resin. Typically, you will need to mix the resin and hardener in a specific ratio to ensure proper curing. Use a clean container and stir the mixture thoroughly to avoid any lumps or bubbles.
- Adding Color and Texture: Once the resin is mixed, you can add color pigments, glitter, or other materials to create the desired effect. If you are embedding sand, shells, or other materials into the resin, you can sprinkle them onto the base surface before pouring the resin.
- Pouring the Resin: Carefully pour the resin onto the base surface, starting from one end and working your way to the other. Use a spreader or a squeegee to evenly distribute the resin and ensure that it covers the entire surface. If you are embedding materials, make sure they are evenly distributed and fully covered by the resin.
Step 4: Curing and Finishing
After pouring the resin, the next step is to allow it to cure. This process can take anywhere from 24 to 72 hours, depending on the type of resin used and the environmental conditions.
- Curing: During the curing process, it is important to keep the countertop in a dust-free environment to prevent any imperfections from forming on the surface. You may also want to cover the countertop with a plastic sheet to protect it from dust and debris.
- Finishing Touches: Once the resin has fully cured, you can sand the surface to remove any rough edges or imperfections. You can also apply a top coat of resin to add an extra layer of protection and enhance the glossy finish.
Step 5: Installation and Enjoyment
The final step is to install your Epoxy Beach Countertop and enjoy the coastal beauty it brings to your home. Whether you choose to install it in your kitchen, bathroom, or another space, your new countertop is sure to be a conversation starter and a source of inspiration.
- Installation: If you are replacing an existing countertop, you may need to hire a professional to help with the installation. Make sure the countertop is securely fastened and level before using it.
- Enjoyment: Once your Epoxy Beach Countertop is installed, take a moment to appreciate the beauty and craftsmanship of your new piece. Whether you are preparing a meal, enjoying a cup of coffee, or simply admiring the view, your countertop will serve as a constant reminder of the peace and tranquility of the coast.
Part 3: Conclusion – Embrace the Coastal Lifestyle with an Epoxy Beach Countertop
In conclusion, an Epoxy Beach Countertop is more than just a functional surface; it is a work of art that brings the beauty and serenity of the coast into your home. Whether you live by the beach or in a landlocked area, this unique design element allows you to create a space that feels like a permanent vacation. With its durability, customization options, and low maintenance, an Epoxy Beach Countertop is a practical and stylish choice for any homeowner.
By following the steps outlined in this article, you can create your own Epoxy Beach Countertop and enjoy the coastal lifestyle every day. So why wait? Bring the beauty of the beach into your home and transform your living space into a serene retreat with an Epoxy Beach Countertop.